Custom patches have become an essential part of modern fashion, clothing manufacturing, business branding and promotional merchandise. From embroidered company logos to personalised jacket badges, custom patches offer an effective way to showcase a brand, represent an organisation or add a distinctive touch to clothing and accessories.
However, creating a high-quality custom patch involves more than choosing an attractive design. The quality of the original logo and how it is prepared for production can make a significant difference to the finished product.
A logo that looks perfect on a computer screen may not always translate successfully into embroidery, woven fabric, PVC or printed patches. Small lettering, complicated shapes, thin lines and unsuitable colour combinations can create production challenges. Without proper preparation, important design elements may become unclear or lose their original appearance.
Whether you are launching a clothing brand, ordering promotional patches for your business, creating team badges or designing personalised accessories, understanding how to prepare your artwork is an important first step.
At Custom Patch Makers UK, we understand that every design represents something important. Your logo may communicate your company’s identity, showcase your team’s achievements or represent a clothing collection you have spent months developing.
In this comprehensive guide, we will explain how to prepare your logo for high-quality custom patch production, covering file formats, image resolution, colours, typography, design simplification, patch materials, sizing, borders and production requirements.
By following these practical recommendations, you can make better design decisions and create custom patches that look professional, attractive and consistent with your original branding.
1. Start with a Clear and Professional Logo
The first step towards producing a high-quality custom patch is choosing a clear logo.
Your logo is the foundation of the entire patch design. It determines the artwork’s shape, colours, lettering and overall appearance.
If your original logo is unclear, pixelated or poorly structured, it can be difficult to reproduce accurately during manufacturing.
Before submitting your artwork, make sure you have the best available version of your design.
Ideally, your logo should have:
- Clear and defined outlines.
- Readable lettering.
- Consistent proportions.
- Properly separated design elements.
- Identifiable colours.
- Minimal unnecessary details.
- A balanced overall layout.
If your business already has professional branding guidelines, use the original approved artwork rather than creating a completely new design.
For example, a clothing brand may have a specific monogram, symbol or wordmark that customers already recognise. Preserving these important elements helps maintain brand consistency across different products.
If you only have a photograph of an existing badge, an old logo or a rough sketch, you can still use it as a starting point. The artwork may simply need to be recreated or adjusted before production.
Remember that the objective is not to change your brand identity. It is to prepare your existing design so it can be reproduced successfully as a physical patch.
2. Choose the Right File Format for Patch Production
One of the most important aspects of preparing your logo is selecting the correct file format.
Different file formats store artwork in different ways. Some maintain sharp edges when resized, while others rely on pixels and can lose quality when enlarged.
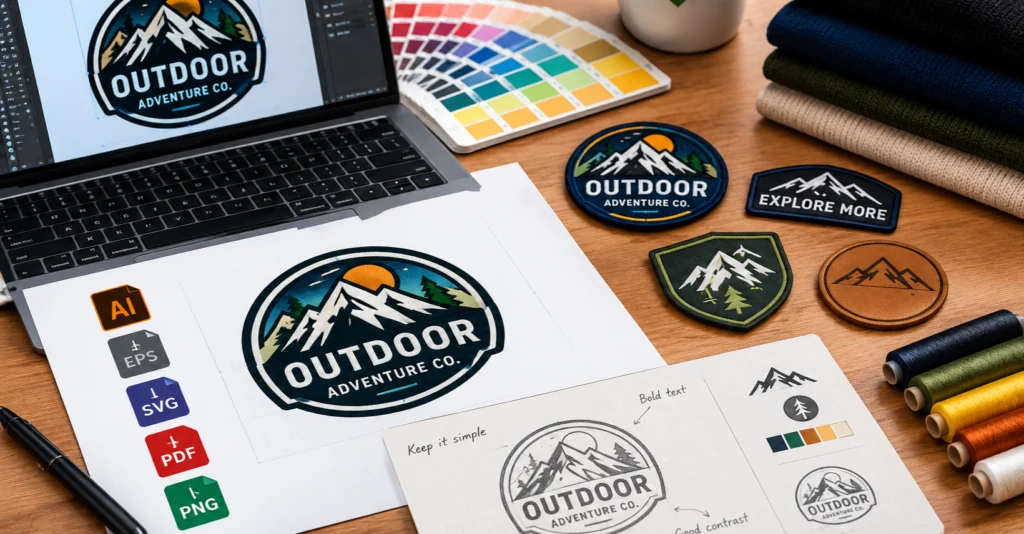
For professional custom patch production, vector artwork is generally the preferred option.
Vector File Formats
Vector graphics use mathematical paths, shapes and curves rather than individual pixels.
This means they can be resized without becoming blurry or distorted.
Popular vector file formats include:
AI (Adobe Illustrator):
AI files are commonly used by professional graphic designers. They preserve editable artwork, shapes, layers and other design information.
EPS (Encapsulated PostScript):
EPS is another widely used vector format. It is useful for sharing scalable artwork between different design and production applications.
SVG (Scalable Vector Graphics):
SVG files are useful for logos, symbols and illustrations. They maintain sharp edges at different sizes and are particularly convenient for digital artwork.
PDF (Portable Document Format):
A properly exported vector PDF can preserve the original artwork’s shapes and outlines. However, not every PDF is vector-based, so it is important to check how the file was created.
Raster File Formats
Raster images are made from individual pixels. Their quality depends on the image resolution and original dimensions.
Common raster formats include:
- PNG
- JPG or JPEG
- TIFF
- PSD
High-resolution PNG files are especially useful because they can preserve transparent backgrounds.
JPG files can also be suitable when they contain clean, high-quality artwork without excessive compression.
Which Format Should You Choose?
| File Format | Main Benefit | Suitability |
|---|---|---|
| AI | Fully editable vector artwork | Excellent |
| EPS | Scalable graphic design | Excellent |
| SVG | Sharp shapes and outlines | Excellent |
| Vector PDF | Preserves vector elements | Excellent |
| PNG | Supports transparent backgrounds | Good |
| JPG | Convenient image format | Good if high resolution |
| PSD | Editable layered artwork | Depends on export quality |
Whenever possible, provide your original vector file. If you only have a PNG or JPG, submit the clearest and largest version available.
Your patch manufacturer can assess the artwork and advise whether it needs to be recreated or simplified.
3. Make Sure Your Logo Has Sufficient Resolution
Image resolution plays an important role in the appearance of custom patches.
A low-resolution logo may look acceptable when displayed as a small image on a website, but it can become noticeably pixelated when enlarged for manufacturing.
This is particularly important when creating detailed patches for jackets, uniforms, bags and promotional products.
For raster artwork, 300 DPI at the intended final size is a useful production target.
For example:
- A 2-inch patch at 300 DPI requires approximately 600 × 600 pixels.
- A 3-inch patch at 300 DPI requires approximately 900 × 900 pixels.
- A 4-inch patch at 300 DPI requires approximately 1200 × 1200 pixels.
These figures assume square artwork. Rectangular designs should be calculated using their actual width and height.
It is also important to understand that increasing the DPI setting of a small image does not automatically improve its original quality.
If you take a tiny website logo and simply change its resolution in an editing programme, you will not recover the missing detail.
Instead, try to obtain the original artwork or have the design professionally recreated.
For vector files, resolution is not a limiting factor in the same way because the artwork is based on scalable paths.
4. Simplify Complicated Logo Designs
One of the biggest challenges in custom patch production is translating complicated digital artwork into physical materials.
A logo may contain shadows, gradients, tiny illustrations, detailed backgrounds and multiple overlapping elements.
Although these features can look impressive on a computer screen, they may not reproduce effectively in traditional embroidery.
This is because embroidery uses physical threads and stitches rather than individual screen pixels.
If your design contains too many small details, some elements may become difficult to recognise.
Remove Unnecessary Details
Look at your logo and identify which elements are essential to its identity.
Consider simplifying:
- Small decorative lines.
- Tiny stars and dots.
- Complex background patterns.
- Extremely thin outlines.
- Unnecessary shadows.
- Small secondary illustrations.
- Overlapping decorative shapes.
For example, imagine a clothing brand logo containing a detailed mountain illustration, a company name, a small slogan and several decorative stars.
If the finished patch is only three inches wide, reproducing every detail may be challenging.
You could retain the mountain symbol and brand name while removing the smaller decorative elements.
The result may be cleaner, easier to recognise and more suitable for embroidery.
Preserve Your Brand’s Identity
Simplification should not remove the most recognisable features of your design.
If your logo contains a unique symbol, distinctive lettering or a specific shape, these elements should remain consistent wherever possible.
A good production-ready logo is not necessarily the most complicated design. It is the version that communicates your brand clearly at the intended patch size.
5. Select Colours That Work with Your Patch Material
Colour selection is another essential part of preparing your logo.
Digital artwork can display millions of colours, gradients and subtle transitions. Physical patch manufacturing has different limitations depending on the production technique.
For example, embroidered patches use coloured threads, while woven patches use fine yarns to create detailed artwork.
PVC patches use moulded coloured material, and printed patches can reproduce a much wider range of visual effects.
Use Consistent Brand Colours
If your business has official brand colours, provide their references whenever possible.
You may have:
- Pantone colour references.
- CMYK values.
- RGB values.
- HEX colour codes.
- Existing thread colour references.
These details help your manufacturer identify the closest available physical colours.
However, digital colour values and actual thread colours are not always identical. Thread materials, lighting and production methods can influence the final appearance.
For this reason, a physical thread chart or approved sample can be useful when colour accuracy is particularly important.
Avoid Too Many Similar Shades
Using too many similar colours can make an embroidered design unnecessarily complicated.
For example, a logo containing several almost identical shades of blue may not benefit from using every shade in the final patch.
Combining similar colours into a simpler palette can produce a cleaner result.
Consider Colour Contrast
Your logo should remain visible against the patch background.
Popular combinations include:
- White artwork on a black background.
- Black artwork on a cream background.
- Gold lettering on navy fabric.
- Red artwork on white fabric.
- Silver details on dark grey material.
- Green artwork on a beige background.
Good contrast helps make logos easier to recognise, especially when patches are attached to jackets, uniforms or bags.
6. Choose the Best Font and Typography
Text is one of the most important elements to consider when preparing a logo for custom patch production.
Many businesses use company names, slogans, initials, establishment dates or location details in their patch designs.
However, small lettering can be difficult to reproduce clearly through embroidery.
A font that looks attractive on a large screen may become unreadable when reduced to a small patch size.
Choose Readable Fonts
For most embroidered patches, bold and simple typography is a practical choice.
Consider the following font styles:
Sans-serif fonts: These have clean, straightforward letter shapes and are suitable for modern business branding.
Block fonts: Strong lettering works well for sports clubs, uniforms, team badges and military-inspired designs.
Bold serif fonts: These can create a traditional and premium appearance when the lettering is sufficiently large.
Custom lettering: Businesses with established typography may prefer their original brand fonts, provided the design can be reproduced clearly.
Avoid Extremely Small Text
If your logo includes a long slogan underneath the company name, consider whether the slogan is necessary for the patch.
For example, a patch measuring only two inches wide may not have enough room for a company name, slogan, location and establishment date.
Instead, prioritise the main brand name or symbol.
If smaller lettering is essential, a woven patch or printed patch may be more suitable than traditional embroidery.
The exact minimum lettering size depends on the font, material, patch dimensions and manufacturing method. Always ask for a production review rather than relying on a universal measurement.
Convert Fonts into Outlines
When submitting vector artwork, it is good practice to convert fonts into outlines or paths.
This ensures that the appearance of the lettering does not change if the production team does not have the original font installed.
It also makes the artwork easier to transfer between design applications.
7. Select the Right Patch Type for Your Logo
Not every logo is suitable for every patch material.
The best production method depends on the artwork’s complexity, desired appearance, budget and intended use.
Understanding the available patch styles helps you choose the right option before manufacturing begins.
Embroidered Patches
Embroidered patches are among the most popular choices for custom branding.
They use coloured threads stitched onto a fabric base to create logos, lettering and decorative designs.
They offer a raised, textured finish that works particularly well for:
- Clothing brands.
- Sports teams.
- Uniforms.
- Workwear.
- Club badges.
- Promotional merchandise.
- Personalised jackets.
Embroidered patches are particularly effective for designs with bold shapes and clearly defined lettering.
However, extremely small details and complicated gradients may need to be simplified.
Woven Patches
Woven patches are created using fine threads woven together to reproduce artwork.
They are a suitable option for designs containing smaller lettering, intricate outlines and finer details.
Because the threads are generally finer than traditional embroidery threads, woven patches can reproduce certain detailed designs more clearly.
They are commonly used for clothing labels, fashion accessories and detailed brand logos.
If your artwork contains small text that cannot easily be simplified, woven patches may be worth considering.
PVC Patches
PVC patches are made from flexible moulded material and are popular for their modern appearance and durability.
They can include raised and recessed design elements, different colours and distinctive textures.
PVC patches are often used for:
- Outdoor clothing.
- Tactical-style accessories.
- Sports equipment.
- Backpacks.
- Workwear.
- Promotional products.
They are particularly useful when you want a bold, dimensional design.
However, extremely fine details still need to be considered during artwork preparation.
Printed Patches
Printed patches are an excellent choice when your artwork contains photographic details, colour gradients or complex illustrations.
Unlike traditional embroidery, printing can reproduce a wider range of colours and fine visual details.
They are useful for designs that would be difficult to recreate using thread alone.
Printed patches can also be suitable for artwork containing subtle colour transitions and detailed graphics.
Chenille Patches
Chenille patches are recognised by their soft, textured and raised appearance.
They are particularly popular in varsity fashion, school clothing, sports jackets and retro-inspired designs.
Large initials, numbers and bold shapes work especially well with this style.
If you want a traditional varsity look, chenille can be an excellent choice.
Leather and Leather-Look Patches
Leather patches provide a distinctive and premium appearance.
They are commonly used on denim jackets, caps, beanies, bags and workwear.
Depending on the material, logos can be created using embossing, engraving or other marking methods.
They are especially suitable for minimalist branding and simple logos.
Choosing the correct patch type ensures that your artwork works with the material rather than against it.
8. Decide the Correct Patch Size Before Finalising Artwork
Patch dimensions should be decided early in the design process.
The size of your finished patch determines how much detail can be included and how clearly the logo will appear.
A design intended for a small sleeve patch will have different requirements from a large back patch.
Before preparing your artwork, identify where the patch will be attached.
Common placements include:
- Front chest areas.
- Jacket sleeves.
- Jacket backs.
- Baseball caps.
- Beanies.
- Backpacks.
- Work uniforms.
- Sports clothing.
- Promotional bags.
Measure the Available Space
If you are adding a patch to an existing garment, measure the available area before finalising the design.
For example, a small circular patch intended for a cap should be designed around the front panel’s available space.
A large rectangular patch for a jacket back can accommodate more text and decorative elements.
Check Your Design at Actual Size
One useful way to assess your artwork is to print it at the intended finished dimensions.
Look at the smallest text, outlines and decorative features.
Ask yourself whether the design remains clear and recognisable.
If some elements are difficult to understand at actual size, they may need to be enlarged, simplified or removed.
Increasing the overall patch dimensions may also provide more room for detailed artwork.
The key is to make size decisions before production rather than discovering problems after manufacturing begins.
9. Choose the Right Patch Shape and Border
The patch outline is another important design consideration.
Your patch can follow a traditional geometric shape or be customised around the logo itself.
Popular patch shapes include:
- Circular.
- Square.
- Rectangular.
- Oval.
- Shield.
- Diamond.
- Custom-shaped outlines.
Standard Patch Shapes
Standard shapes are suitable for many traditional logo designs.
Circular patches are commonly used for club badges and organisational emblems.
Rectangular patches work well for brand names, labels and text-based designs.
Shield-shaped patches are popular for uniforms, sports teams and organisations.
Custom-Shaped Patches
Custom-shaped patches follow the outline of the artwork.
They can create a more distinctive appearance, especially for mascots, symbols and illustrated logos.
However, extremely narrow points or complicated outer shapes may require special cutting techniques.
Understanding Patch Borders
The border gives your patch a finished appearance and helps define its outer shape.
Two common options include:
Merrowed borders: These create a traditional raised stitched edge and are commonly used for regular shapes such as circles, squares and rectangles.
Heat-cut or laser-cut edges: These are useful for custom shapes and designs with more complicated outlines.
Your manufacturer can recommend the most suitable border depending on your patch material and design.
When preparing artwork, make sure important text and graphics are positioned away from the outer edge.
This provides a safe area and reduces the risk of important design elements becoming crowded by the finishing border.
10. Prepare the Background Correctly
The background is an important part of your patch design.
It provides contrast, supports the artwork and helps create a balanced overall appearance.
For embroidered patches, the background may be made from a fabric base or created using stitched thread coverage.
For printed and PVC patches, background colours are incorporated into the production artwork.
Select a Suitable Background Colour
Choose a background that allows the logo to stand out.
For example:
- White logos can work well on black or navy backgrounds.
- Dark lettering can look attractive on cream or beige backgrounds.
- Gold designs can create a premium appearance on dark colours.
- Bright colours can stand out against neutral backgrounds.
Keep the Design Balanced
Avoid placing too many elements close to the edge.
Your main logo should have enough space around it to remain visually clear.
If your patch includes a border, make sure the background and outline complement each other.
A clean background can make a simple logo look professional without requiring additional decoration.
11. Understand Embroidery Digitising
Preparing a logo for embroidered patch production involves a technical process called digitising.
Digitising converts the artwork into a stitch file that an embroidery machine can understand.
It determines how the machine will reproduce the design through physical stitches.
This process is different from simply converting an image into another file format.
A digitiser considers:
- Stitch types.
- Stitch directions.
- Stitch density.
- Thread sequence.
- Underlay stitches.
- Shape outlines.
- Fabric behaviour.
- Design dimensions.
Why Digitising Matters
Two patches can use the same logo but produce different results depending on how the artwork has been digitised.
Poor digitising may lead to:
- Uneven stitching.
- Distorted lettering.
- Excessive thread density.
- Gaps between design elements.
- Puckering.
- Poor shape definition.
A professionally prepared stitch file helps the embroidery machine reproduce the artwork more consistently.
It is also important to understand that embroidery digitising is not the same as ordinary graphic design.
A logo that is visually perfect may still require adjustments to its stitch direction, density or individual elements.
This is why professional artwork preparation and digitising are essential parts of producing quality embroidered patches.
12. Provide Clear Artwork Instructions to Your Manufacturer
Even if you have a professional logo file, it is important to communicate your requirements clearly.
Manufacturers need to understand how you want the finished patch to look and where it will be used.
A complete artwork brief can reduce confusion and help avoid unnecessary revisions.
When submitting your design, include:
Original logo: Provide the highest-quality version available.
Patch dimensions: State your preferred width and height.
Patch type: Specify whether you want embroidered, woven, PVC, printed, chenille or leather patches.
Colour preferences: Include brand colour references where available.
Shape: Explain whether you want a standard or custom outline.
Border: Select your preferred border finish.
Backing: Specify whether you require iron-on, sew-on, Velcro or another suitable backing option.
Placement: Explain whether the patch will be attached to a jacket, cap, bag, uniform or another product.
Reference images: Include examples if you have a particular appearance in mind.
For example, you might tell your manufacturer:
“I need a circular embroidered patch measuring 8 cm, with a black background, white logo and red outer border. The finished patch will be attached to the front of a jacket.”
This provides a much clearer starting point than simply sending an image without any instructions.
13. Choose the Correct Patch Backing
The backing is another important part of custom patch production.
It determines how the finished patch will be attached to clothing or accessories.
Different backing options are suitable for different applications.
Sew-On Backing
Sew-on backing is a traditional option that allows patches to be stitched directly onto garments.
It is suitable for jackets, uniforms, bags and many types of clothing.
This option is useful when you want a permanent attachment.
Iron-On Backing
Iron-on patches include a heat-activated adhesive layer.
They can be attached using an appropriate heat press or iron, depending on the patch and garment instructions.
They are popular for clothing customisation and personal projects.
However, heat-sensitive fabrics may require special care.
Velcro Backing
Velcro backing is useful when patches need to be removed or replaced.
It is commonly used for uniforms, outdoor equipment and certain tactical-style accessories.
Adhesive Backing
Adhesive backing is useful for temporary applications and surfaces that do not require permanent stitching.
It may not be suitable for every fabric or repeated washing.
Before choosing backing, consider the material of the garment and how frequently the patch will be used or removed.
14. Review Your Digital Proof Before Production
A digital proof is an important stage in the custom patch manufacturing process.
It gives you an opportunity to review the proposed patch design before physical production begins.
Do not approve a proof without checking the details carefully.
Even small mistakes can affect the finished product.
What Should You Check?
Spelling: Check every letter in the company name, slogan, date and other wording.
Dimensions: Make sure the patch measurements are correct.
Colours: Compare the proposed colours with your brand references.
Shape: Confirm that the outline matches your requested design.
Placement: Review the position of the logo and other elements.
Borders: Check the thickness and colour of the border.
Artwork details: Make sure important elements have not been removed or changed unexpectedly.
Backing: Confirm the selected attachment method.
If the proof does not match your expectations, request adjustments before approving production.
A digital proof is a visual representation of the intended patch. For particularly detailed designs or large orders, a physical sample or production sew-out can provide additional confidence.
Taking time at this stage helps reduce the possibility of avoidable production problems.
15. Common Mistakes to Avoid When Preparing Patch Artwork
Even experienced businesses can make mistakes when preparing artwork for custom patches.
Understanding these issues can help you avoid unnecessary delays and achieve better results.
Sending Low-Quality Images
One of the most common problems is submitting small screenshots or compressed website logos.
These images may contain blurred edges and missing details.
Solution: Always provide the original vector artwork or the highest-resolution image available.
Using Too Many Small Details
Complicated illustrations can become unclear when reproduced in embroidery.
Solution: Simplify unnecessary elements and focus on the most recognisable parts of your logo.
Choosing Unsuitable Fonts
Thin or decorative lettering can become difficult to read at small patch sizes.
Solution: Use clear typography and check the design at its actual production dimensions.
Ignoring Colour Differences
Digital colours do not always match physical thread or material colours.
Solution: Provide colour references and review available thread or material samples.
Selecting the Wrong Patch Type
A design that requires photographic detail may not be suitable for traditional embroidery.
Solution: Match your artwork to the production technique.
Forgetting the Border and Safe Area
Important text positioned too close to the edge can become crowded during finishing.
Solution: Leave enough space between the main artwork and the outer border.
Not Checking the Final Proof
Approving artwork too quickly can result in incorrect colours, dimensions or spelling.
Solution: Review every detail before giving production approval.
16. Why Professional Artwork Preparation Saves Time and Improves Results
Preparing your logo correctly before manufacturing offers several advantages.
It makes communication easier, reduces unnecessary artwork changes and gives the production team a clearer understanding of your requirements.
Better Design Accuracy
Clean artwork helps preserve the original proportions, colours and important visual features of your brand.
Fewer Production Revisions
When your design is properly prepared, the manufacturer may spend less time requesting clarification or making avoidable adjustments.
Improved Readability
Simplifying tiny details and selecting suitable fonts helps ensure that your logo remains recognisable.
Better Material Selection
Understanding the design’s complexity makes it easier to choose between embroidery, woven, PVC, printed and other patch styles.
Consistent Branding
Professional artwork can be reused across future products and repeat orders.
For example, a clothing company may use the same approved logo artwork for jacket patches, cap patches, bags and uniforms.
Maintaining a consistent design helps create a more recognisable brand identity.
17. How Custom Patches Help Businesses Build a Stronger Brand
Custom patches are not simply decorative accessories. They can become an important part of a company’s branding strategy.
Businesses across different industries use personalised patches to create recognisable products and communicate their identity.
Clothing and Fashion Brands
Fashion brands use custom patches to add distinctive details to jackets, denim, hoodies, caps and other apparel.
A carefully designed patch can make a product feel more individual and help differentiate it from standard clothing.
Sports Teams and Clubs
Sports organisations use patches to display team names, logos, membership details and achievements.
They can create a consistent appearance across uniforms and accessories.
Corporate Businesses
Companies can use embroidered patches on staff uniforms, workwear and promotional products.
They help identify employees and create a professional appearance.
Outdoor and Lifestyle Brands
Outdoor clothing companies often use PVC, woven and embroidered patches to complement backpacks, jackets and other equipment.
The patch material can be selected according to the product’s intended use.
Events and Promotional Campaigns
Custom patches can also be created for festivals, exhibitions, conferences, clubs and special events.
They can serve as branded merchandise, keepsakes or collectible accessories.
By investing in suitable artwork and production methods, businesses can turn simple logos into attractive physical branding products.
18. Your Complete Checklist Before Submitting a Logo
Before sending your design for custom patch production, use this checklist to review your artwork.
| Artwork Requirement | What to Check |
|---|---|
| File format | AI, EPS, SVG or vector PDF preferred |
| Image quality | High-resolution raster artwork if no vector is available |
| Resolution | Aim for 300 DPI at final size for raster files |
| Logo clarity | Clear shapes and recognisable design elements |
| Typography | Readable text with outlined fonts where appropriate |
| Colours | Confirmed brand colours or physical colour references |
| Design complexity | Unnecessary tiny details removed |
| Patch dimensions | Final width and height confirmed |
| Patch shape | Circle, rectangle, shield or custom shape |
| Border | Suitable edge finish selected |
| Background | Appropriate colour and contrast |
| Patch material | Embroidered, woven, PVC, printed or another type |
| Backing | Sew-on, iron-on, Velcro or other suitable option |
| Placement | Intended garment or accessory confirmed |
| Proof | Spelling, dimensions, colours and design approved |
Following this checklist gives your manufacturer a much clearer production brief.
It also helps you identify potential problems before manufacturing begins.
Frequently Asked Questions About Preparing Logos for Custom Patch Production
1. What is the best file format for custom patch production?
Vector formats such as AI, EPS, SVG and vector PDF are generally preferred because they maintain sharp edges when resized.
High-resolution PNG and JPG files can also be suitable, depending on the design and production method.
2. Can I create a custom patch using a PNG logo?
Yes. A PNG logo can be used as a starting point for custom patch production.
For the best results, provide a high-resolution image with clean edges. If necessary, the artwork may need to be recreated as a vector before manufacturing.
3. Can complicated logos be turned into embroidered patches?
Yes, but some complicated designs may need adjustments.
Small details, gradients and fine lettering can be difficult to reproduce through embroidery. Simplifying the artwork or selecting a woven or printed patch may produce better results.
4. What resolution should my logo have?
For raster artwork, 300 DPI at the intended finished size is a useful target.
Vector artwork is generally preferred because it can be resized without losing sharpness.
5. Can I use my original company colours?
Yes. You can provide your brand colour references, including Pantone codes where available.
Your manufacturer can help identify the closest suitable thread or material colours.
6. Are embroidered patches better than woven patches?
Neither option is automatically better.
Embroidered patches offer a textured appearance with visible stitching, while woven patches can reproduce finer details and smaller lettering.
The best option depends on your artwork and preferred finish.
7. Can I use small text on custom patches?
Small text may be possible, but readability depends on the patch dimensions, font, material and production technique.
For very small lettering, woven or printed patches may be more suitable than traditional embroidery.
8. Do I need a professional designer to prepare my logo?
No. Having professional artwork is helpful, but it is not essential to get started.
You can provide your existing logo, a clear image, a sketch or a reference design. Your manufacturer can assess what adjustments may be required.
9. What is embroidery digitising?
Embroidery digitising is the process of converting artwork into a machine-readable stitch file.
It determines the stitch types, directions, density and sequence needed to reproduce the design.
10. Why should I approve a digital proof before production?
A digital proof allows you to check the design, spelling, dimensions, colours, borders and placement before manufacturing.
It is an important opportunity to request corrections before the physical patches are made.
Conclusion
Preparing your logo correctly is one of the most important steps towards achieving high-quality custom patch production.
From choosing the right file format to simplifying complicated artwork, selecting suitable colours and deciding on the correct patch material, every detail can influence the final result.
A professional-looking patch begins with clear artwork, appropriate dimensions and a production method that suits the design.
Whether you are creating embroidered badges for a clothing brand, woven labels for fashion products, PVC patches for outdoor accessories or printed patches for promotional campaigns, proper preparation helps ensure that your logo is reproduced as clearly and accurately as possible.
Remember to review your design at its actual size, confirm your colours, select the right backing and carefully approve the digital proof before production.
At Custom Patch Makers UK, we believe every patch should represent the identity and creativity behind the design. Whether you are ordering personalised patches for a new clothing collection, a business, a sports team or an organisation, choosing the right artwork and production approach can make all the difference.
Contact Us and Explore our custom patch options and start planning your next design with confidence.